

Posted by Robert Hernandez on Dec 23rd 2024

Do you have a women's welding gloves sizing chart?
Safety & PPE

Short Answer
Measure around your hand above the thumb and match that measurement to a glove size chart.
Details
Getting the right glove size is critical for comfort, control, and safety. A glove that is too tight restricts movement. Too loose, and you lose dexterity.
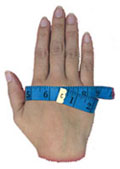
To measure your hand:
- Wrap a tape measure around your hand above the V of your thumb
- Measure the circumference in inches
- Match that number to the size chart below
Women's Welding Glove Size Chart
← Swipe table to see more sizes →
| Size | XS | S | M | L | XL |
|---|---|---|---|---|---|
| Inches | 6" - 7" | 7" - 8" | 8" - 9" | 9" - 10" | 10" - 11" |
Special Glove Features
| Name | Description |
|---|---|
| Welted Seams | Extra material protects stitching from sparks and abrasion. |
| Seamless Index Finger | Smoother finger design for better control and dexterity. |
| Pre-Curved Fit | Ergonomic shape that matches the natural hand position. |
| Kevlar® Stitching | Stronger, heat-resistant thread for longer glove life. |
Thumb Types
| Name | Description |
|---|---|
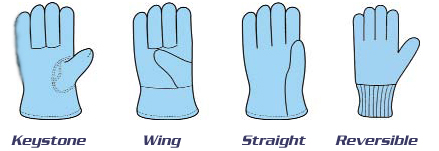
| Keystone Thumb | Best movement and comfort. Common on higher-end gloves. |
| Wing Thumb | Flexible design with no palm seams for reduced fatigue. |
| Straight Thumb | Simple design, good for basic gripping tasks. |
| Reversible Thumb | Ambidextrous design for left or right-hand use. |
Shop Tip
A properly fitted glove should feel snug but not tight. If you can’t move your fingers easily, size up.
Bottom Line
Measure your hand, use the chart, and choose a glove that fits comfortably. The right fit improves control, safety, and overall welding performance.


